Sunday, November 18, 2012

Enable or disable windows startup programs

How enable or disable windows startup programs?


Sometimes you may feel that your computer is taking long time to boot. Usually it should take less than minute to boot your PC. This is depend on your hardware configuration. If you have latest processor and enough RAM definitely machine will be boot quickly otherwise it make take one or two minutes to complete the boot. But if there a abnormal latency you can imagine there can be issue with startup process. Because there can be a lot of auto start programs on you system.


There are several programs that start with the boot process of your PC or laptop. Before you install other third party software, there are few programs in the windows startup. You can check this just after the installation of your OS. You can simply open the Run dialog box and type msconfig and hit enter. Clicking on Startup tab you can find the auto start programs of your computer. After you install other Microsoft or non-Microsoft programs there can be additional startup programs in the startup programs list. Examine the startup program list, you can identify and troubleshot problems that prevent Windows from starting slowly .You can determine all startup programs and learn how to enable or disable them by follow the examples below.

how to find and change startup programs windows 7


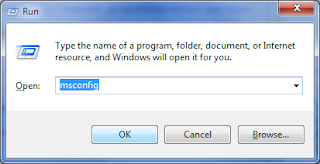
  1. Click on Windows key+R to open the Run dialog box. Type msconfig and click OK. Or you can simply type the word msconfig on the start menu search box in windows 7.

  2. It will open windows system configuration tool for you.

  3. On the general tab you can see there are three startup configuration modes. Normal startup mode is the windows default start up mode. By selecting this option all startup programs will be loaded at the boot time. Diagnostic startup mode is load basic windows services and drivers at the boot time. Selective startup mode is the way that you can choose what to start during the system boot and what not.

  4. If you want to change the startup programs you have to click on startup tab. There you can see a list of programs that automatically load in to memory during the system startup. You can quickly enable or disable startup programs using provided check boxes.

  5. Please be careful when you doing changes to these programs. First try to determine what are the un wanted programs and un-tick them. If you have installed a virus guard on your system it will show as a startup program. Please don't disable it. Otherwise you will be at a great security risk.


  6. If you have install third party software such as Apple Quick Time Player, Orbit Download Manager, Nero burning ROM, Java Runtime, CyberLink You Cam, Google Talk, Media players, there can be lot of programs in the startup list. You have the choice to decide what should be load what should not.


  7. After selecting programs that you want to load during the startup process, click OK. You have to restart your system to take the effect. You can continue with your works and do the restart later. If there ware large number of un wanted programs, You can gain better loading time than the past.


Configure the program loading method to prevent un-wanted startup directly.


  1. Most of the programs that loaded automatically during the startup process, have configuration options that you can enable or disable the it. As an example I'll show you how to disable Orbit and utorrent downloaders during the boot.
  2. Disable orbit on system startup.

  3. Disable utorrent on system startup.

Tools that can be use to enable disable startup programs on windows XP or later


There are some third party software that you can use to configure the startup programs of your computer. Autoruns for Windows is a handy utility for startup management tool from sysinternals. You can download it for free of charge.

Just download an un zip the file. Double click on autoruns.exe or right click on it an click on Run as Administer. You can see a comprehensive list of programs filter by Boot Execute, Drivers, Winlogon, etc.


Another tool is CCleaner from www.piriform.com. It has a option to list all auto start programs and enable or disable them. Start CCleaner and click on tools icon. Then select startup tab. There you can see all startup programs on your PC. You can download the free edition of the program.


How to add a program to windows startup?


  1. Click on start menu and type startup or expand all programs node and select startup folder. Right click on it and select open.

  2. Now you have open startup folder of your PC. Right click on a free space and select new. on the the sub menu click on Shortcut.

  3. Browse and select the program that you want to start on the startup. Click on next.


  4. Type a name for the shortcut and click on finish.

  5. Restart your computer to apply the changes. You can see the program you have selected is automatically starts when the system startup.

* You have to log as system administrator to perform theses tasks.
* Please note that you must restart your computer to take the effect of your changes.
* Don't disable your virus guard from the startup programs.
* Disabling some programs may result the slow startup of the related programs.
* Adding more programs to startup may badly affect your system performance.

Tuesday, November 6, 2012

Change partition or drive letter in windows7

How change the drive letter in windows 7?


In some cases you may want to change your drive letter to another. Using Windows Disk Management Utility tool you can assign, remove or change a drive letter in your computer. As a example you may need to change your pen drive letter M to F or D. Following example will give you a clear idea about how to perform that task. Note that you cannot change the drive letter which you have installed the Operating system (System Drive) through the Windows Disk Management Tool.

Also you can remove or hide partitions from my computer. So anyone can't see it through My Computer window. If you want to make that drive visible again in My Computer you can simply assign a drive letter. That's all. Be careful to close all opened files which are store in the drive that you need to change the drive letter. Sometimes you may have installed some programs on the drive that you need to change the letter. After changing letter of that partition, that program fail to load or gives you some error messages like "the program fail to load the file of file does not found." You can change back the drive letter and access the program again.

Step by step how to change the drive letter in windows 7


  1. Right click on my computer and click on Manage. This will open Computer Management window for you.
  2. Under the left navigation panel (computer management(Local) you can see the storage section. Expand it and click on Disk Management. This will open Disk Management Utility for you.

  3. You can see all disk drive in your computer including Hard Disks,Pen Drives,CD-DVD drives etc. Select the drive that you want to change the drive letter and right click on it. Click on Change Drive Letter and Paths.
  4. After clicking on change drive letter and paths it will open a small dialog box. Then click on Change button. Another dialog box will appear and you can select a letter from the drop down list. Note that it will list only available drive letter of the system. Pick a desired letter and click ok.
  5. You will be prompted to confirm the task. It informs that you Some programs that rely on drive letters might not run correctly. Before you confirm make sure no such program using this drive letter. Then click on ok.
  6. After changing the drive letter you can see the disk management windows shows the new drive letter and you can see the drive on My Computer.

How to assign drive letter to a partition in windows 7


  1. Right click on my computer and click on Manage.
  2. Select the partition that you need to assign drive letter. Right click on it and click on Change Drive Letter and Paths.

  3. A dialog box will appear and click on add button.
  4. Select a letter and click on ok button.
  5. You can see the assigned drive on my computer and disk management tool.

How to remove the drive letter of a partition in windows 7


  1. Right click on the drive that you need to remove the letter. Click on Change Drive Letter and Paths.
  2. Click on remove button. A confirmation dialog will appear Make sure the drive it not in use and no programs rely on the drive. Click on ok.


  3. Drive will hide from my computer and you are no longer able to open it. But you can still see the partition through Disk Management Utility.


Using above process, you can change the letter of your CD-Drive, DVD-Drive, Pen Drive Or SD card.
* You have to log as administrator to perform this task.
* You can't change the system drive letter( drive which contains the Operating System) using this process.
* Changing the drive letter does not affect the data on that drive.
* Removing drive from my computer does not affect the data on that partition.
* Make sure no other program using the drive before remove or change the letter.

Saturday, October 6, 2012

How to speed up a USB pen drive

How increase the data transfer speed of a USB pen drive in windows 7?

USB pen drives are widely use for quick data transfer. You can easily move large files into a USB flash drive. This makes easier to copy data from computer to computer. Now technology makes our works easier than ever. Today you can copy Gigabytes of data into a small pen drive in a very short time. In last few years there was a dramatic changes in data storage devices. Comparing to past few years capacity of a pen drive and its data transfer rate has been increased amazingly. But sometimes you may experienced with slow data transfer rare during coping data into your flash drive. This tutorial explains you steps to increase your USB data transfer speed.

USB Versions and data transfer speeds
USB 1.1 1.5 MB/s 1st Generation
USB 2.0 60 MB/s 2nd Generation
USB 3.0 625 MB/s 3rd Generation

This is the 3rd generation of USB drives. USB 3.0 drives have 625 MB/s data transfer speed. This is a very high data transfer rate comparing to USB 2.0. Actually a Super Speed!

Modern laptops and desktop computers are support to plug 3rd generation USB devices. All USB 3.0 drives have the backward compatibility. But you can't get the full performance of the USB 3.0 devices by plugging them in to USB 2.0 Ports. Also data transfer rate depends on hardware configuration of your machine, available RAM, and the operating system.

  1. Open My Computer and right click on your flash drive then select Properties.

    select pen drive properties in my computer
  2. Under the Properties dialog box, select Hardware tab. Then select your USB flash drive from the All disk drives section.

    Select USB Hardware Tab

  1. After selecting your USB pen drive click on Properties button and select Volumes tab.

    USB Volumes

  2. USB Pen drive quick removal

    Under the Volumes tab, Click on Populate button. New property dialog box will appear. Click on Policies tab. You can see the default selection is Quick Removal. That means you can eject/disconnect the Pen Drive without using Safely Remove Hardware option. There is no harm to your flash drive. But selecting this option, the data transfer rate is little bit slow

    USB Flash drive better performance

    Check the Better Performance radio button to speed up the data transfer rate of your device. If you use this option, remember that you have to use the Safely Remove Hardware option to eject the pen drive from your computer. If not, your pen drive will be damage.

  3. After selecting Better Performance option you can copy data in to your flash drive quickly. Here is the comparison

    Before optimization
    Data copy speed before optimization
    After optimization
    Data copy speed after optimization
  4. After selecting Better Performance option, remember that eject pen drive using safely remove hardware option.

    lSafely remove usb pen drive

    Stop usb pen drive
    Safely remove hardware


Some other useful instructions to increase the data transfer speed of a pen drive

  1. USB Hubusb hub device

    If you use a USB hub to connect all your USB devices such as Dongle,pen drive,external hard drives,web cameras, please stop it. The USB hub draws all its power from the connected computer's USB interface. It divides the bandwidth among all the devices and it may damage your USB port. Because some devices may require more current from the USB port. It is good practice to use a single device to a USB port if it is require more current.

    USB CableUSB Extension cable

    Don't use very lengthy cable to plug your USB pen drive to the computer. It may badly affect the data transfer speed. You may experienced with data loss or slower transfer rate. So use a cable less than 2m long .

  2. You can update your driver software to obtain the best performance. Install the best driver design for your OS and hardware configuration. Windows can automatically search for a suitable driver.


    Update Usb Driver

Thursday, January 5, 2012

Change mozilla firefox cache directory

How to change the Mozilla Firefox cache folder?

Sometimes you may need to change firefox cache folder location. But in firefox browser, this can't be do easily. You may have some knowledge to do it. Following example show you how to do this.
Internet browser use cache folder for fast page loads. It can help the application's performance. All internet Browsers temporary stored downloaded contents in this cache folder. Contents in the cache folder changes frequently. So It is good idea to use a RAM Drive to store those contents. Then it will help to fast web page views and reduce the read/write to the hard disk.. Because browser can access RAM faster than the physical disk.


FireFox stores its all preference in a Java Script file called "prefs.js". You can see this file in firefox profile folder which is in your AppData Folder. It will be like C:\Users\User_Name\AppData\Roaming\Mozilla\Firefox\Profiles\il3yfhy9.default\.


Steps to change the Mozilla FireFox cache location

  1. Open Mozilla Firefox Internet browser and type about:config in the address bar. Then press enter.


  2. Then FireFox tells you changing advanced settings can be harmful to the stability, security, and performance of the application. To continue click on "I'll be careful, I promise!" button.
  3. It will open Mozilla Firefox's Advanced Setting Window for you.


  4. In the filter section start typing browser.cache. Then it will show you the all cache related settings of the FireFox Internet Browser. Check the variable " browser.cache.disk.parent_directory " exists among all listed settings. By default this variable does not exists.
  5. If the variable " browser.cache.disk.parent_directory " does not exist in your browser settings, you have to manually add that variable and assign a suitable value for it. Lets see how to do it.
  6. Right click on the free space on the settings list and click on New->String from the popup menu.


  7. Then it will let you to add new preference to the FireFox Settings. Enter "browser.cache.disk.parent_directory" as the preference name and hit enter.


  8. Then FireFox will ask you to enter a value for your variable. Here you have to type your new cache location. That means the folder where do you want to store browser's temporary files. Type the cache location and press enter.


  9. After entering new variable you must restart the FireFox browser to take effect. After that you can see the temporary files and folders created in the new cache folder that you have mentioned above.

* After adding new variable, you must restart the FireFox to take the effect.
* Please be careful what you are doing with these advance settings. Don't change any variable if you don't know what it is to be use for.