How to Clear virtual memory page file in Windows-7
You can configure the system to delete page files when the system is shut down. It prevents direct access to the page file and ensures sensitive information is not available to an unauthorized user.
When the system boots up the operating system determines the allocated page files to open by reading the registry. The page files stores in the HKEY_LOCAL_MACHINE\SYSTEM\CurrentControlSet\Control\Session Manager\Memory Management\PagingFiles and \ExistingPageFiles registry values. It stores the path of the paging file.
When the system boots up the operating system determines the allocated page files to open by reading the registry. The page files stores in the HKEY_LOCAL_MACHINE\SYSTEM\CurrentControlSet\Control\Session Manager\Memory Management\PagingFiles and \ExistingPageFiles registry values. It stores the path of the paging file.
You can set the Local Security Policy to clean the page file during system shutdown. By default this policy is disabled that means it does not delete the page files when the system is shut down. When this policy is enabled, the virtual memory page file is cleared during system shutdown. But enabling this policy the system startup and shutdown process take some additional time to complete. That means it slow down the startup and the shutdown process.

It is recommend that you don't disable or delete the paging file. If a lack of RAM is slowing your computer, virtual memory moves data from RAM to a space called a paging file. Transferring data to and from the paging file frees up RAM so your computer can complete its work without issue.
How to automatically clear the windows page files when the computer shuts down?
Method 1
-
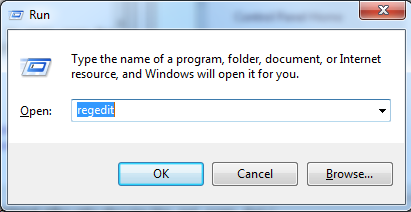
Press Windows Logo button and R key. It will open Run dialog box for you.

-
Type regedit and press enter.
-
Navigate to HKEY_LOCAL_MACHINE\SYSTEM\CurrentControlSet\Control\Session Manager\Memory Management and right click on ClearPageFileAtShutdown.

-
Change the value data to 1 (base=hexadecimal) and click OK.

-
Restart the computer to take the effect.
Method 2
-
Press Windows Logo button and R key. It will open Run dialog box for you.

-
Type SystemPropertiesAdvanced and press OK.
-
Click on Advanced Tab.
-
Under the performance section, click on Settings button. It will open performance Options dialog box for you.

-
Under the Virtual memory Section click on Change button. It will open Virtual Memory settings dialog box for you.

-
Un tick Automatically manage paging file size for all drives check box.

-
Check the No paging file radio button and click on Set.
Method 3
-
Click start menu button and click the control panel
-
Double click on Administrative Tools
-
Double click on Local Security Policy
-
Expand the node and click on Security Options.
-
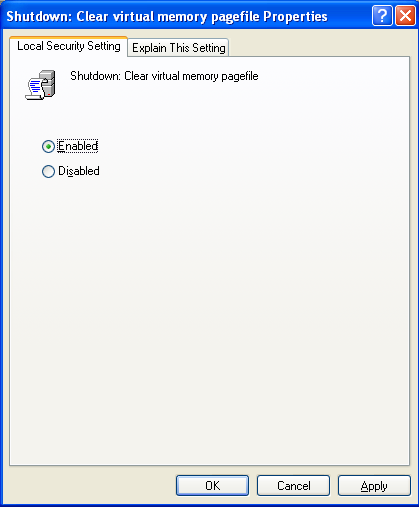
Select Shutdown:Clear virtual memory pagefile and double click on it
or right click on it and select Properties.
-
Check "Enabled" radio button.
-
Click OK.
-
Then restart the system to take the effect.
Windows Page file location
By default the operating system stores the page file in the system drive. If your system drive is C, the page file is located in the drive C.
It is recommend that you don't disable or delete the paging file. If a lack of RAM is slowing your computer, virtual memory moves data from RAM to a space called a paging file. Transferring data to and from the paging file frees up RAM so your computer can complete its work without issue.
* After editing the registry, you must restart the computer to take effect.
* After perform this task the system will clear the page file every time when you shuts down the system. This may slow the shutdown time one or two minutes.
* After perform this task the system will clear the page file every time when you shuts down the system. This may slow the shutdown time one or two minutes.


No comments:
Post a Comment