Wednesday, April 24, 2013

Check spelling in Adobe Dreamweaver


Sometimes the IDE fails to open spell checker program using menu commands and short cut keys. In such situations restart your IDE.

These screen shots are taken from Adobe Dreamweaver CS 5.5

How to check spelling in Adobe Dreamweaver?

When you are developing web application or web sites it is very important to use correct spelling and grammar. It makes easy to understand what you have wrote. Because if you have misspelled one or more words, the reader will be confused. So it is important to use correct words in your sentences.

But we can't always write 100% error free paragraph. Because sometimes there can be accident key presses during the typing even you have know the correct spellings to those words. Mistakes can be happen every where. It is human nature. But we can reduce those errors using automated tools. That's why most of Integrated Development Environments include the facility to check spelling in your text. In word processing software, they check spelling, grammar and the style.

Check spelling in your web page using Adobe Dreamweaver.

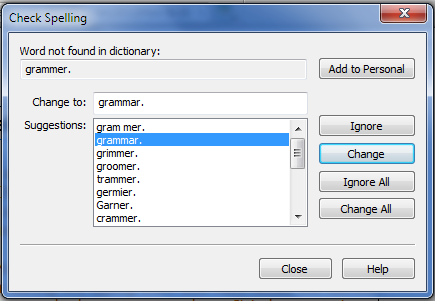
Dreamweaver has nice tool for checking spelling in your web pages. You can open spell checker by hitting Shift+F7 key combination or selecting menu Commands->Check Spelling.

Check spelling in adobe Dreamweaver

This will open spell check dialog box for you. It has useful features for spell corrections.
spelling check dialog box
When the Dreamweaver founds a word with incorrect spelling, it will highlight the word on your document and show some suggestions. You can pick the correct word from the suggestion list. In most cases the default selection is the correct word. Then click on change button to change only that word. Also you can change all incorrect spelling for that word using single mouse click. To to that click on Change All button. If you think you have spell the word correctly you can ignore the word. Also you can ignore all occurrences of that word by clicking on Ignore All button. Meantime you can also add those words to the custom list by clicking Add to personal button.

Most of the grammar checker software use a dictionary for match your words. So it will show you errors for all words in your HTML document except dictionary words. In such case your name or company name will be shown as an incorrect word. Frequently changing such words is annoying. So you can add those word as your personal words. What you have to do is when displaying errors on such word, click on Add to Personal button. After that IDE never shows errors on that words.


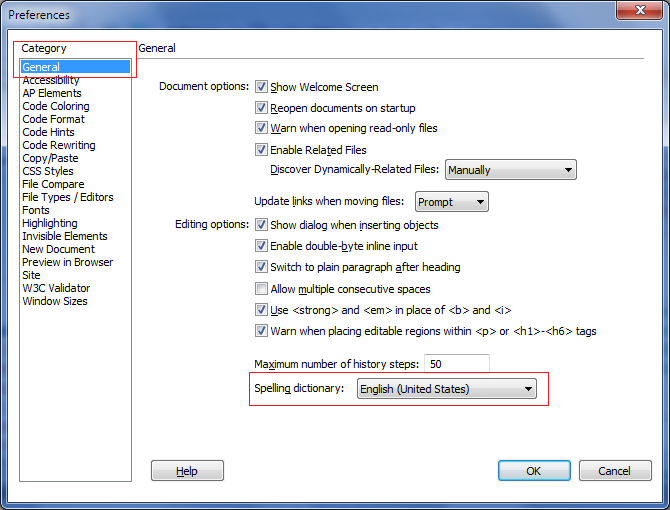
Spellings will be check according to a dictionary. The default dictionary is English (United State). You can change this dictionary in Dreamweaver preferences dialog box.

Click Edit menu next to the File and select Preferences. (Last menu Item). Also you can use the short cut keys for open preferences dialog box. To do that press Ctrl+U key combination. Select General category under the Category list. (By default this is selected).

You can see there is a drop down list to select preferred dictionary at the bottom of the window. You can change the dictionary from here. After you have selected a dictionary click OK.

set preferred dictionary in Dreamweaver

Sunday, April 21, 2013

How to clear internet browser history

How to clear web browser history?

What browser history?

When you are browsing internet, your web browser automatically recorded your browsing history. This may include every web address you have visited. Every browser keep a track of websites you have visited in a organized manner. This will provide an easy access to those website on a later date. That means when you type a web address before you visits this time, it shows the address as a suggestion on the address bar. What you have to do is simply click on that link instead of typing complete URL.

What will be kept as browser history?

  • Date time you have visited a specific site.
  • URL of the visited page.
  • Some cached contents of the site such as images.
  • Cookies that are related to websites that you have visited.
  • Some form related data (auto fill data).

Basically all web browsers provide your web history as your browser settings. You can decide whether the browser history should record or not. Most of browsers shows the stored web history by hitting Ctrl + H. This is the short cut to view your web history.

Web history and your security

Your security and privacy depends on the browser web history. Because every one can see what are the sites that you have visited and some personal information. If you allow your browser to save your passwords, this may be a major risk and you may loose your privacy. Be careful when allow the browser to save your visited sites, auto fill form data, user names and passwords.

Sometimes you may log in to your bank account, Gmail, Facebook or what kind of website using office computer. This computer may not use only you. There can be other users use this computer at the office. So it is not a wise decision to keep browser history with your office computer. This may led third party to view your personal data and access to your important data. So you can clear browser history and cache every time before you log off from the computer or set browser settings to automatically clear the browser history.

See bellow web history window (Opera).
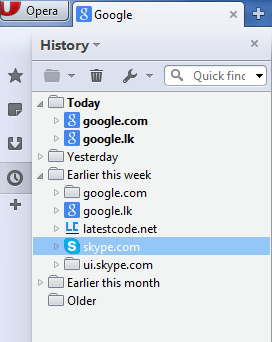
sample-web-history


Most of the websites ask you to 'keep logged in' or 'remember me' or 'stay signed in'. Usually the user login screen provide a check box to ask this question.
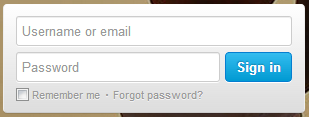
twtter remember me
By default this is a checked check box. That means the browser automatically keeps you as logged on. Suppose that you have forget to sign out from your Gmail of Facebook account and closed the browser. After you have leave the computer, if another person open that web browser; he can log into your Gmail or Facebook account whit out entering user name and password. This is a great security risk. Then everyone can see your personal data and change some settings and destroy your account.
facebook-remember-me-login-option
What you have to do is carefully see if there an option like 'stay logged in' before you hit the log in button. If there a setting to keep logged in, un check the check box and sign in to your account. Because lot of people loose there accounts at libraries and computer labs at their university or college.
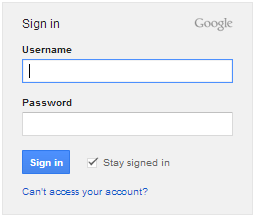
Gmail stay signed in
When you are use your laptop, mobile phone or personal computer this feature is useful. Because it is annoying enter user name and password every time that you log in to your mail of other social network account.

But browsing the internet using public computers, you have to think your privacy and security.


If you do not delete your browser history, anyone can see what are the sites you have seen. So it is a wise decision to delete your internet history before you leave the machine. This is very important when you are using public computers.

Every web browser provides the facility to store the web history and clear it. Also you can manually clear the web history and ask browser to delete the internet history every time when you exit from the browser.

There are lot of third party software that can be use to erase browser internet history and cache. You can download one from internet and use it to delete your browser history. CCleaner is a free software that can use to erase your browser history and cache.

Bellow tutorial explains you how to delete web history of all installed web browsers of your machine at the same time.

  1. Go to CCleaner website and download the latest Ccleaner software and install it on your computer.
  2. Once you have install the software, open it. There you can see a tab called "Ccleaner" at the top of the left hand side. Click on that tab. (By default this is selected) Then you can see two tabs called windows and applications. If you need to clear the Microsoft Internet Explorer web history and cache please tick appropriate check box.
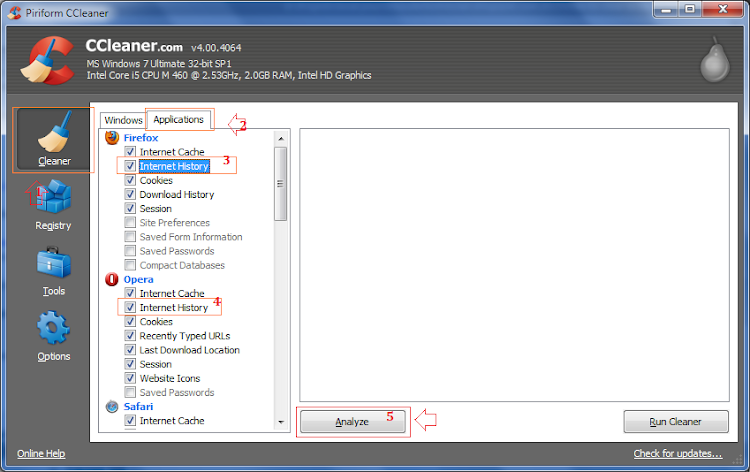
    clear browser history using ccleaner
  3. You may have install multiple web browsers on your system. In such a situation click on Application tab next to the windows tab. Then you can see there are list of web browsers that you have installed on your computer. Click on appropriate check boxes to clear the web history of selected browsers. Click on Analyze button. This may be take some time to complete the scan.
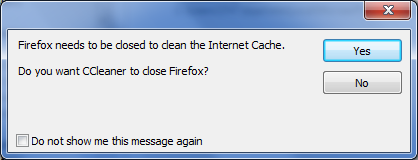
    ask to close the browser before delete web history
    While the scan is running you may have opened some browsers. Then CCleaner will ask for close the browser automatically. If you are in the middle of something save your work and click on OK. Otherwise click cancel.
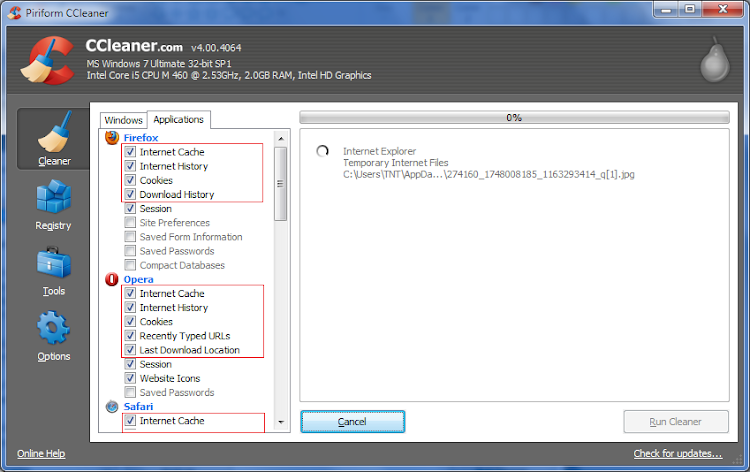
    clear browser history of multiple browsers
  4. After scanning web history and cache files of all installed browsers CCleaner will show you a list of history and cache related items that schedule to delete.
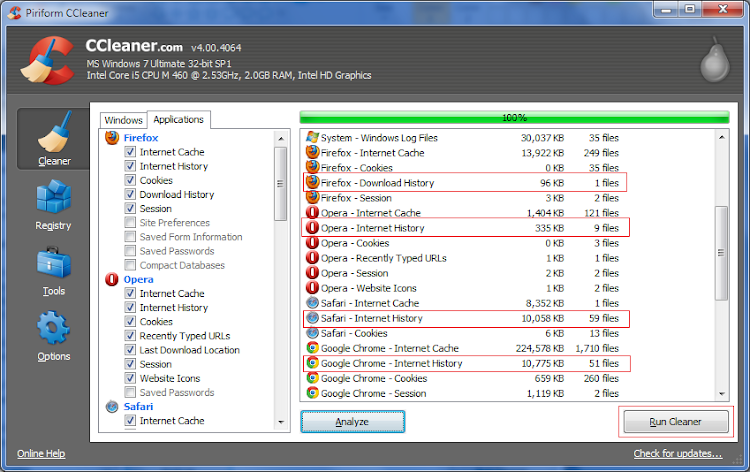
    list your browser's web history
    Then click on "Run Cleaner" button.

    permanently delete browser internet history
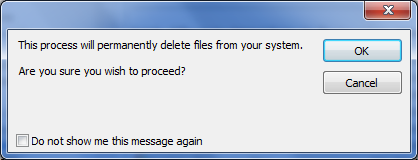
    Then it will shows a confirmation message to delete the browser history permanently. Click on OK.
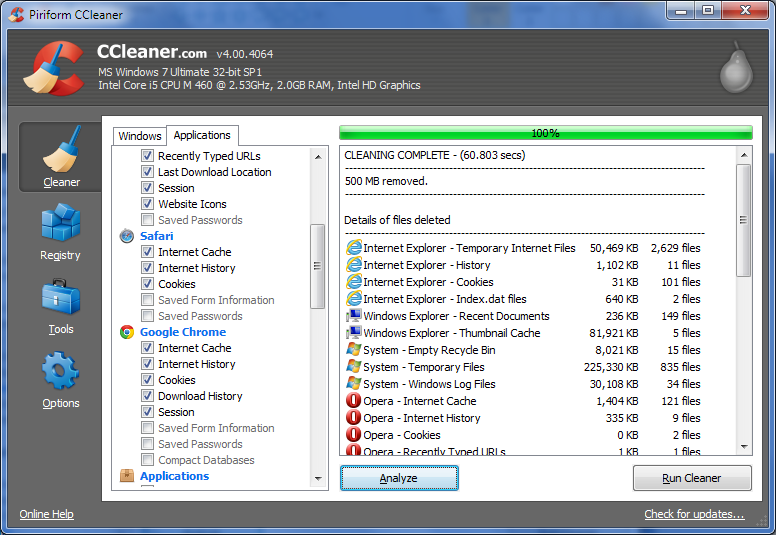
    delete your internet history
    This is a pretty easy way to delete your internet history. you can use this tool to delete history and cache of Mozill Firefox, Internet Explorer, Google Chrome, Apple Safari, Opera, and Sea Monkey browsers.

Important Note: Before you clean your web history, saved passwords and email addresses, browser cache, and form data, make sure you have all important data with you such as passwords and user names for different web sites. If there is an accident deletion you may not be able to recover those information. So please be careful.

Saturday, April 13, 2013

How to modify image metadata in windows

Read Metadata Online

How to modify image image metadata?

What are image metadata?

Image meta data are use to keep some information regarding the image. They are embedded to the image. Metadata has various properties. Basically every image has width, height and image type information. Digital cameras can store more details on the image. Suppose that you have taken an image from your iPhone, It will store the coordinations of the place where the image was taken, Camera maker and camera model, focal length, etc. Like wise it can store copyright information in an image.

What are the information that I can modified using windows?

  • Copyright information
  • Title
  • Camera Model
  • Camera Maker
  • Date taken
  • Subject , Comments
  • ISO speed
  • metering Mode
  • Flash Mode
  • Lens maker and model
  • Light source

You can't change all metadata property values using windows. But you can change above properties and some other properties. you can't change image width, height, resolution, mime type, bit depth, etc. Also you can delete some metadata properties of an image. As an example you cand delete comment or author's name.

You can use windows explorer to change some image metadata. This tutorial explains you how to modify metadata of a photo step by step.

  1. First open your image folder/directory contains photoes that you need to read metadata.

  2. Right click on a image and select properties.

    Modify image meta data using windows

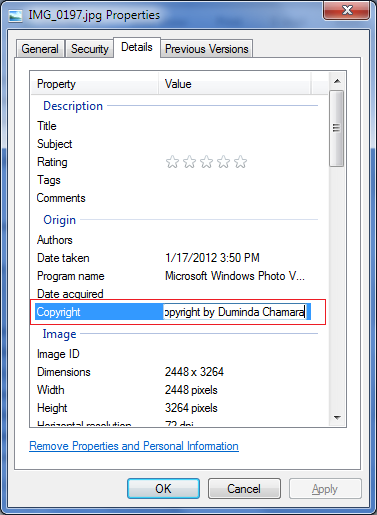
  3. It will open file properties windows for you. Then select Details tab. You can see a list of properties and its values in this section. Click on a property value to modify the current value. If it is a editable property, you will be provided text area, calender or drop down list to pick appropriate values.

    modify image metadata using windows

    Above screen shot shows you how to change the copyright information of the image. Likewise you can change some information. Click on each property and check weather it is edit able or not.

  4. Suppose that you need to change the "Date Taken", click on the property Date Taken from Origin section. Then pick the date that you want to set and click OK. That's all.

    change the date taken property of an image

How to remove properties and personal information of an image in windows?

  1. You can remove personal information that stored in an image and some properties of the image. But you can't remove some properties of the image. Right click on the image and select properties. Then select Details tab. Click on Remove properties and personal information link.

    remove properties and personal information of an image

  2. It will open Remove properties dialog box for you. check the radio button "Remove the following properties from this file". Then you can select the properties that you need to delete from the image. Then click on OK. It will remove selected properties from your photo.

    Remove image meta data

  3. Note that some times you will get an error message that saying windows can't remove the specific property from the image. Hope windows does not support for remove that tag.

You have ti make sure the image is not marked as "Read Only". otherwise you can't change image metadata properties from the image. To make writable, right click on the image and select properties. Under the General tab you can see a check box named "Read-only in Attributes section. un-check the check box to make it writable.

You may also have permissions to change these attributes. Under the Security tab you can change the file permissions.

Some times you may be not able to change all selected properties due to one of the following reasons,


  • Image has complex meta data information. (lot of meta data properties. camera and other camera related information)
  • Due to corrupted images (this can be happen camera faults, disk read write errors, etc.)
  • Sometimes windows image encoder program may encountered with a problem you can't save properties.
  • Windows refused to change some properties like GPS data (Don't know why). Sometimes this will be fixed in future releases.
 

Possible Error Messages


The file is read only so it is not possible to change metadata.

 
Unable to modify 'Altitude' property. This may happen due to several reasons.


Windows cannot clear all personal properties. But you may be able to remove these properties using third party exif tag editor.