Wednesday, May 22, 2013

format pen drive in windows 7

How to format pen drive in windows 7?

You may need to format your pen/flash drive before you use it first time. But now, most of the pen drives comes as preformatted pen drives by the manufacturer. So you can use it without formatting.

What happens when you format a disk?

Before you use your pen drive you have to make it visible to your Operating System. So you need to format it to a file system that operating system can read. Format process organize the disk in to small blocks and keep a track of indexes of that blocks. This block is known as Allocation Unit Size. There are different allocation unit sizes. You can manually choose the allocation unit size or let the operating system to decide the default size. When you format a disk you can divide it in to multiple logical sections. Also you can format those sections to different File Systems. File Systems are based on Operating Systems. In Microsoft Windows there are mainly three file systems.

  1. FAT - File Allocation Table (FAT,FAT 16,FAT 32)
  2. NTFS - New Technology File System
  3. exFAT - Extended File Allocation Table

When you format a pen drive, you can use any of above file system. If you plug your pen drive in to a DVD player or any other device, you have to consider the file system that the device supports. Otherwise that device will be failed to read your pen drive.

Most of LINUX Operating Systems can read FAT and NTFS file-systems. But Windows Operating Systems can't read Linux file systems such as ext, ext3 or ext4.

Format your pen drive using windows 7

This tutorial explains you to format a pen drive in windows 7. There are different methods that you can use to format the pen drive. Before you format your flash drive plug it into a USB port.

Method 1

1. Open my computer. Then right click on your pen drive and select "Format". Usually it has the drive letter after your hard drive partition letters. It will be "F","G", or any other. In my computer pen drive letter is "J".
Format USB pen using windows

2. After you click on Format menu, disk format dialog box will appear. Here you can choose the File system and allocation unit size. Also you can select the "quick format" method. Then click on OK. Then you need to confirm format. Click on OK.


  1. Pen drive format options

    Disk format confirmation
    Disk Format Complete

    Before you format your pen drive make sure back up any data you want to keep before formatting. Otherwise you may loose your valuable data. Because formatting process will erase existing data on the USB pen drive.

    Then determine the file system that you need. Every file system has different advantages. If you use pen drive for play music and plug it in to a music player, or If you use your pen drive for boot operating system, FAT32 is good. NTFS has improved security features. Now most of smart TV and DVD players supports NTFS file format.

    You can use FAT, FAT32, exFAT and NTFS in both windows and Linux systems. If you use your pen drive with Linux and Windows Operating Systems it is good idea to format it using FAT or NTFS. If you use your pen drive only with Linux systems you can use ext file system.

    However you can view ext partitions using Windows Disk Management Tool. You can delete them but can't read using windows.

    Then you have to choose the format method. If you check the Quick Format check box. pen drive will be formatted quickly. In this option creates a new file table without erase the disk. In Normal format it fully erase the existing file table on the drive. If you use Quick Format option some third party data recovery programs can recover existing data on the drive. But full format will erase every thing on the drive and difficult to recover without loosing data. Quick format is faster than the normal format. It will take less than minute to format a pen drive of 4GB.

    Volume Label : You can assign name to the your pen drive here. If you keep it blank, by default you pen drive name is set to "Removable disk". Simply you can set your name or nick name here.

  2. After USB Drive format
  3. Also you can format pen drive or partition using Windows Disk Management Tool.

    Frequent fromats will shorten the life time of the pen drive . So don't do un necessory full formats. After you have format the pen drive it the allocation table will consume some amount of the disk space. So free space is little bit lower than the actual disk capacity. NTFS indexing needs more space than FAT32 system.

Wednesday, May 15, 2013

Windows Page Files and Virtual Memory

Windows Page Files and Virtual Memory

What is Page File?

Page files is a file that stored in the file system and work as virtual memory of the system. It can load data in to RAM and store data from RAM. Actually this is an extension to the RAM. In windows operating systems this file named as pagefile.sys.

page files in windows 7

How Page File Works?

When you have limited physical RAM, computer can save some data into the page file. When you are working with an application program, RAM stores temporary data in it, which is needed by the application program. Because the program needs frequent modifications to those data stored in the RAM. this happens continuously while you are using the program. But if you stop working with that software for a significant amount of time, the data related to that program on the RAM that hasn't been used recently will be sent to the page file. Then the computer can read those data from the page file when needed. However virtual memory is always being used. When you load more programs in to the computer's memory, the Operating System moves some data from RAM to the page file.

Page Files and System Performance.

When you are open new programs, there should be sufficient amount of memory available in the RAM for that programs. So Operating System will examine recently unmodified data in the RAM and send them in to the page file. After moving data into the disk RAM can allocate memory for newly opened programs. So your new program will work without trouble.

But moving data from RAM to the physical disk and load data from the page file into the RAM is slower process. because Read/Write speed of hard disks are significantly slower than the RAM. So you will experienced some slowness while changing application usage. Because it take some time to transfer paged data to the RAM.


What is the recommended page file/virtual memory size?

Size of the page file depends on the installed RAM of the machine. By default, windows page file size is 1.5 amount of the RAM. For example if you have 1GB of RAM, you may need (1.5 x 2=3) 3GB for the page file. But when the system has more RAM, the size of page file decrease. If you have enough RAM installed, you may not require page files.

Basically page file size is controlled by the Operating System. Windows can automatically manage page file size for all drives. There are three values for the system page file size. They are

  • Minimum allowed
  • Recommended
  • Currently allocated

If you have 2GB of RAM

above values looks like 16MB, 2863MB, and 1909MB respectively. By default drive C stores the paging file. Also you can set custom page file sizes for all drives in your computer. Also you can disable the page files. You can configure system page files using Advance System Settings.

Windows Virtual Memory Allocation

Setting multiple page files on each partition may reduce perormance of the system. Also you can set page files in a drive which is not the OS installed (system drive). This can gain some added performance. Disabling virtual memory may occur system errors and windows might not record details of the errors. Page files are required to get full memory dump. Memory dump helps to analyze some errors after system failure and useful for debugging information.

Is it good idea to disable page files?

Actually disable the virtual memory page files is not a good idea. Because it can cause crash your system. Some programs need more memory. If you use Photoshop , other image editing software or video editing software, definitely they need more RAM. If your system runs out of RAM, System cannot swapped out of RAM in to the page files. So your will stuck or there can be unexpected system crashes. So it is a not good idea to disable the virtual memory of your computer.

Tuesday, May 7, 2013

create a website using Adobe Dreamweaver

How to create a website in Adobe Dreamweaver?

When developing complex web applications it is important to organize your files neatly. That means keep files in a project in a structured way. As an example you may write CSS in everywhere in your project. Sometimes write in-line CSS and sometimes include CSS code from a separate file. Suppose that you have to change a CSS code of your project. Then you have to look it fore everywhere in the project. Because you can't remember where is the CSS file that use to control the styles of the web page. So it is better to keep your all CSS files in a separate folder called "css" or "styles". Likewise you can put your JavaScript, images, and PHP or any other related files in separate folders. It will provide an easy access to website source files. No need to browse files in folders, you can access all files in the website using the IDE. It save your valuable time.

Advantages of using Dreamweaver IDE in web development.

  1. Easy resource management (link images, js, css files easily).
  2. Auto code completion (Fast web development / Save time).
  3. PHP, JavaScript, CSS, jQuery, ASP ,JSP, XML support.
  4. Maintain HTML standards (HTML 4.0, HTML 5, etc).
  5. Syntax highlighting and code indentation. (Easy to read code)
  6. Instant HTML preview.
  7. Display typing errors on your code.
  8. Offer HTML templates.
  9. Offer function definition.
  10. Quick text search (specific code block, current document, all opened files, of entire project).
  11. Easy find and replace options.
  12. Fast navigation (No need to browse directories. Access all files and folders via the IDE).
  13. Ability to integrate Version Control software.
  14. Provide facility to connect to a remote server / Easy file upload.
  15. Easy to rename images, files, etc. Dreamweaver can automatically detect the changes.
  16. Spelling Checking.


Hoe to Create a new site using Adobe Dreamweaver?


You can manage your code easily if you use an Integrated Development Environment (IDE) like Adobe Dreamweaver CS4, Dreamweaver CS5, Dreamweaver CS5.5, or Dreamweaver CS6. So it is very important to use a IDE for your projects. In this example I will explain you how to create a project/site using Adobe Dreamweaver.

Dreamweaver offers you an easy way to create web sites. Click on "Site" menu item and select "New Site" menu item.

create new website in adobe dreamweaver

It will open site management dialog box for you. Before you create the project you have to create root folder for your website. Sometimes you may be work with apache web server or IIS server. it doesn't matter. Create a folder in htdocs folder in apache or www root in IIS web server. This will be your website root folder. All files related to your website should be kept here.

Adobe Dreamweaver site setup

  1. After that you have open site setup dialog box, you have to give a name for your site. Then you need to specify a Local Site Folder (the folder that you have created in apache htdocs or IIS www folder).

  2. After yo have select the root folder, click on "Advanced Settings" tab. Then select "Local Info". You can specify a default image folder for your website. Click and browse the image folder. You can configure remote server. But now this tutorial explains you configure a local web URL. So enter the your local testing server URL pointed to the website directory in the apache htdocs folder.

    Also you can set the links relative to the document or site root. It is better to use the links relative to the Site root. If you set this opption to Site Root, all links will be created relative to the site root folder. If you set this option to Document, all links will created relative to the document. See examples bellow.

    Related to the Document : the path looks like <img src="../../images/test.png" /> (followed by dots and slashes)

    Related to Site Root : <img src="/images/test.png" /> (followed by a forward slash. No dots)

    Click Save button to save your site configuration.

  3. Now you have completed the site setup. Then you have to organize your folders and files in an meaningful way. to create a well structured website follow the instructions bellow.

    • Keep your images in a separate folder. You can create your images folder in the root folder.
    • Keep your all JavaScript files in a separate folder. This also can place in the website root folder.
    • Keep your all CSS files in a separate folder.
    • If you use third party coding libraries such as pdf generators, mailer classes you can keep those in a folder called "lib".
    • Name your files in an meaningful way. Give similar names for related files. It makes easy access to the files and you can easily determine the file by its name. For a example, suppose that you have a file for news edit. and another file to save the news. and other file for delete news. Do the file naming as follows.

      news-edit.php
      news-save.php
      news-delete.php

      Now you can easily find the files that related to the news section. Likewise always try to keep meaningful file names.
  4. After you have create the sample website your folder structure look like follows.
    Sample website
    After you have created the website you may need to edit the settings. You can do it as follows. Click on Site menu and select "Manage Sites"
    Mange your website

    Or click the drop-down in the files section (right hand side) and select "Mange Sites"


    mange websites usiing dreamweaver
  5. Edit-website-settings
    Then Manage Website dialog box will open. click on "Edit" button to change your settings. You can delete your website by clicking on "Remove" button. It deletes the website from the Dreamweaver IDE only. No changes to physical files.

Sunday, May 5, 2013

How to configure an FTP client

Related Articles

How to Change FTP Account Settings

How Create new FTP Account

How to configure an FTP client for your hosting account?

This tutorial explains you how to configure an FTP client to access your files in the server. Once you have set up an ftp account, you may need to configure an ftp client program to upload files to the server. There are lot of ftp client programs. FileZilla is the one of most famous open source ftp client that you can download from the internet. It is free and easy to use. Filezilla is a cross-platform ftp client software.

Go to FileZilla site and download the latest version and install it on your computer. It has number of useful features. Editing remote files, resume and transfer large files, drag and drop file upload and download are some of them. Before you configure your ftp client you need to know the ftp details of that account. To view your ftp details log in to the c-panel of the hosting account and click on "FTP Accounts" under the "Files Section".

FTP account configuration

After you have logged in to the ftp account section in your C-Panel, you can see a list of available FTP accounts under the "FTP Accounts" section. find the ftp account that you need to get ftp details and click on "Configure FTP Client".

view ftp details

How to view FTP details of an account?


After you click on the "Configure FTP Client" link you can see the ftp user name, host, and the port.

change ftp quota in c-panel

Under the "Manual Settings" you can see your ftp details. Also you can download a FTP configuration file for filezilla. To do that click on "FTP Configuration File" link. It will download an XML file with ftp details. You can import this file in FileZilla to connect to the ftp account. Also you can manually configure the ftp client using above details.

How to connect to a FTP account using FileZilla using Quick Connect?

  1. Once you have download and install the FileZilla client, open the program. You can see the quick connect bar bellow the tools bar. Here you can enter ftp details and connect to the ftp account.

    FileZilla Quick Connect

    Enter Host, User name , Password, and the Port. You can't see the FTP password in the ftp details section of the C-Panel. You have to remember the password at the time of the ftp account creation. If you forget the password, you can reset the password. Once you have enter the ftp details click on "Quick Connect" button.

  2. filezilla remember ftp passwords

    Then FileZilla will ask you to remember the password for this FTP account. If you need to re-connect to this ftp account later, you can save the password. Then you can log in to this account without entering password.

  3. After yo have connected to the remote server you can see a window like bellow.
    filezilla file viewer
    At your left hand side it displays your local files. At your right hand side it displays the remote files. Now you can upload files to the ftp account.

How to import FTP configuration file to FileZilla?

  1. The other option is import the ftp configuration file to filezilla. Click on "file" menu and select "import". Then browse the XML ftp configuration file. Locate the ftp configuration file and click on "Open" in the file browse dialog box

    FileZilla site manager

    import ftp configuration file
  2. Import Success
    FileZilla ask you to import the site to the site manager. Click OK. Then you can access this site using site manager.
  3. After you have imported the FTP configuration file, you can see your ftp account under the "Site Manager". To open site manager click on Files menu and select "Site Manager" or you can press Ctrl+S key combination.
    Open FileZilla Site Manager
  4. In the site manager window you can see the imported site under "My Sites" section. Select the site and click on connect button at the bottom of the window.
    FileZilla Site Manager
    After you have clicked connect button filezilla will ask you to enter the password. Enter the password for connect to the ftp account and click OK.
    enter ftp password
  5. You can use Site Manager for change your account details. Also you can delete ftp accounts and add new accounts


Saturday, May 4, 2013

change FTP account settings in C-Panel

How to change FTP account settings in CPanel?

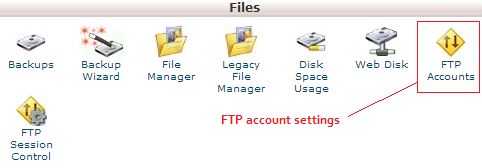
This tutorial explains you how to change FTP account settings. Once you have set up an ftp account, you may need to change FTP password or disk quota later. After log in to your Hosting Account C-Panel, Click on "FTP accounts" under the "Files" section. Scroll down the page. You can see a list of FTP Accounts bellow the "Add FTP Account" section. If you have large number of ftp accounts, you can search for it. Type account name and click on "Search Accounts" button.

View FTP accounts
You can see the details of the ftp account and links to account settings. Also you can see current disk usage. Here you can change FTP password, Disk quota and get the details for configure a FTP Client. Also you can delete the FTP account. Click on given links to perform the operation.

FTP account configuration

How to change Disk Quota of an FTP account?


You can create ftp accounts with unlimited disk quota. But in some situations this is not practical. If you have limited disk space, you have to set the specific disk space for each FTP account. Disk space is depends on your hosting plan. Click on link "Change Quota". It will open ftp disk quota settings for you.
change ftp quota in c-panel

You can set disk space in MB. Once you have entered the disk quota, click on "Change Quota" link. FTP user can upload files up to allocated disk space. After that he will get an error message like "Quota exceeded". After he exceeded the ftp quota, he need to delete some files to gain space for upload new files to the server.

However you can set a lower space through the c-panel than the current usage. For an example, current ftp account has 20MB of quota; you can set it to 10 MB. No files will be deleted. But user can't upload any new file without deleting existing files.

How to change the password of an FTP account in C-Panel?

Some times you may need to change the password of your FTP account. This is very simple. Click on the "Change Password" Link. It will open a panel for change your password. You can use the random password generation tool to create a strong password. Once you have enter the passwords, click on "Change Password" button to save the settings. After you have change the password you need to update the password of your ftp client.
Change the ftp password in c-panel

How to delete an FTP account in C-Panel?

Sometimes you may need to delete an FTP account from your hosting account. Click on "Delete" link.

Delete ftp account
There are two ways to remove an ftp account from your hosting account.

  1. Delete ftp user account only.(keep all the associated files untouched/No data loss)
  2. Delete ftp user account and all related files. (Delete every things related to the ftp account)

Be careful when you are deleting FTP accounts. Because there can be other ftp accounts pointed to the sub directories of that account. In such situations users who have ftp accounts pointed to the deleted account, will lost their data. Also they will be lost the access to the ftp account. So before you delete the ftp account check the folder path of the account. You can check the directory path as follows.

View ftp folder path

Special FTP accounts

There are special ftp accounts that linked to your main hosting account. They are main ftp account and access logs account. You can't delete these two accounts.

Special ftp accounts

Also you can't change your main ftp account password via the c-panel. To change your main ftp account password, you have to log in to your hosting account. There you can change the C-panel login password and main FTP password.

create an FTP account in CPanel

How to create an FTP account in CPanel?

This tutorial explains you how to create an FTP account in your Cpanel. Sometimes you need to create FTP accounts for different users. Creating an ftp account allows a user to access specific directory in your server. Then the user can access that folder using an ftp client software such as filezilla. But user can't access other folders in the server. Also you can use your web browser to access the ftp server folder.

FTP stands for File Transfer Protocol. It is a standard network protocol. This protocol is use to manage files in your server. You can create, delete, download, upload, files and change folder permissions using FTP commands. There is a set of ftp commands to deal with files and folders. Default ftp port is 21. FTP servers use port 21 to communicate with ftp client and the server.

Creating ftp accounts you can set the access control to your server. For an example a template designers don't need the access to the back end code of a web application. So you can give the access control only to the templates folder to the designer. He can't access other files in the server.

Create a new FTP account using Cpanel.

Before creating an ftp account, you have to log on to your hosting account control panel (usually called cpanel). Number of ftp accounts that you are allowed to create is depends on the your hosting plan. Some hosting plans allow you to create unlimited ftp accounts. But some have limitations.

  1. Open your Cpanel and go to the Files Section. Then click on FTP Accounts.

    Create an FTP account in C-Panel
  2. To create an ftp account you have to give an user name,password and directory name. But you do not need to give directory name by default. Because it use your user name as the directory name. You can change this directory name as your wish.

    Add new ftp account in cpanel

  1. ftp user name already exists
    When you are creating an ftp account, you must give a unique login name for each account. If you give an existing login name, it will display an error message similer to above. You can select existing directory in your server for create FTP account. Type first two or three letters of the directory that you need to use for your FTP account. Then It will display list of directory names similar to your input. Select the one that you want.

    select an existing directory

  2. It is very important to set a strong password for your ftp account. You can use your own password or you can use password generator tool of the Cpanel. Click on "Generate Password" button to create strong password.

    Also you can chose what character combination should be use in your password by clicking "Advanced Options" link. It will allows you to chose different combination of letters, numbers, special characters. Before you create your ftp account you should copy your password in a safe place. Later you can change your ftp account password.

    Check the "I have copied this password in a safe place" check box and click on "Use password". You can click cancel button to use your own password. You can check the strength of your password. Always try to use stronger password.
    set password to your ftp account
  3. You can allocate disk quota for your account. Here you can set custom disk space or unlimited disk space. check "Unlimited" radio button for unlimited disk space. Or you can specify disk space in MB. Type the space that you required in the given text box. Then click on "Create FTP Account" button. This will create an FTP account with given Quota.
    FTP account successfully created
  4. After you have created the FTP account, you can see it in the list of FTP account section.

    List FTP Accounts in your hosting account